


FOR THE
GRP
COMPOSITE
INDUSTRY

Kitchen Sink wastewater is a mixture of detergent soap, food left-over, and water
used in washing kitchen utensils. This wastewater as it travel through the drain pipe,
gunk is formed and this substance clings to the pipe wall and solidifies and overtime
hardens which completely clogs the drain pipe and notoriously is very difficult to de-
clog and costly.
Here' a simple DIY kitchen wastewater interceptor for you to avoid the troubles of
drain pipe clogging. But, first, let me explain how it works.
How to get rid of kitchen fat, oil, and grease (FOG) from clogging
your drain pipe
by: Elias Quijano
sss
Now, let me show you the drawing. You can have this drawing
for free. Click this link to download the drawings:
1.
FOG interceptor 1 of 2
2.
FOG interceptor 2 of 2
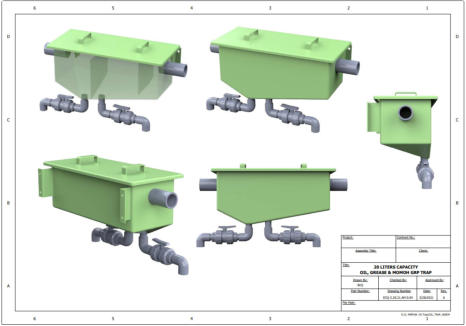
Meanwhile, you can fabricate this FOG interceptor in any of
these 2 ways:
1.
Using ¼” thick plywood, assemble it according to the
drawing, then laminate both the inside and outside to make
it water-proof and be resistant to chemical corrosion;
2.
Make a GRP flat sheet using 3 layers of chooped strand
mat, 450 g/m2. Cut to size all the parts according to the
drawing, and assemble it. Joints can be done by lamination.
To make the GRP flat sheet, you will need the following tools
and materials:
A.
Tools
1. A flat-surface table;
2. Lamb Wool roller
3. Air-bubble releasing roller (screw-type roller)
4. Laminating brush
5. Fiberglass Reinforced Cut-off Wheels
B.
Raw Materials
1. Lumiror film
2. Chopped Strand Mat 450g/m2 (csm450)
3. Isopthalic Resin - premix with cobalt 6% napthanate
4. MEKP
5. Acetone (solvent for cleaning)
C.
Procedure for making the flat sheet
1. On the working table, lay flat the lumiror film (lumiror film
will act as a barrier between the working table and the
laminate);
2. Lay on the working lable, 1 layer of of the chopped strand
mat, the size of which must equal to the surface area of all
the parts that you will need to complete the whole FOG
interceptor project;
3. Catalyze enough quantity of premix resin (enough for one
shot that you can cover, say half liter in each shot). Make a
test how much MEKP you will need to add to give you
enough time to complete the whole lamination process. For
example, if you can finish the lamination work in 2 hours,
you must estimate how many shots it will take you to finish
the flat sheet lamination work, Say 5 shots, therefore you
will need a gelling time of not less than 30 minutes per shot;
4. Impregnate the csm450 with the catalyzed resin using the
lamb wool roller;
5. Overlay another layer over the first layer and imprenate in
the same way;
6. Overlay the 3rd and last layer and impregnate, then using
the air-bubble releasing roller, roller the whole laminate,
squeezing out the air bubbles. Allow the laminate to gel and
eventually harden and cure.
7. Clean your rollers with acetone on a separate container
intended for this purpose.
D.
Cutting the parts
1. Make a carboard pattern for the side, bottom, and top
parts of the FOG interceptor, according to the drawing;
2. Cut the parts to size according to your pattern;
3. Use an angle power grinder using a cutting disc 100mm
dia. intended for GRP laminate.
E.
Assembling the components
1. Prepare a putty mix (resin + calcium carbonate powder)
2. Assemble the parts in such a way that it can be held
temporarily, and then apply catalyzed putty mix on the joints.
To catalyze the putty mix, simpply add MEKP and mix it
thorougly using a pair of putty knife or spatula;
3. Allow the joints to harden. Then, apply a fast-gelling
tack.A fast-gelling tack is a a small piece of csm450
impregnated with catalyzed resin (greater amount of MEKP
is added than the usual amount, to effect a fast gelling);
4. Apply a permanent lamination on all the joints;
5. Allow the assembly to cure completely. A complete cure
means, the laminate will register a barcol hardness of 40+.
Note: A good post cure can be done by allowing it directly
under the sunlight for a day.
You can buy the following raw materials and tools:
1.
Polyester Laminating Resin and MEKP Catalyst-
https://amzn.to/3XtTeU0
2.
Acetone or lacquer thinner - https://amzn.to/3Is2uDT
3.
Mohair Laminating Roller - https://amzn.to/3E7RYiE
4.
Fiberglass Laminating Roller - https://amzn.to/412xlOH
5.
Clear mylar cellophane wrap roll - https://amzn.to/3Yz2asz
6.
Royal Brush Golden Taklon Paint Brushs -
https://amzn.to/40WMDV4
7.
Calcium Carbonate Powder - https://amzn.to/40YfwA2
8.
Angle grinder power tool - https://amzn.to/3I7LIIV
9.
Fiberglass Reinforced Cut-off Wheels -
https://amzn.to/3It4wDG
10.
PVC pipes - https://amzn.to/3lzCAVD
11.
PVC valves - https://amzn.to/3XF5lO2

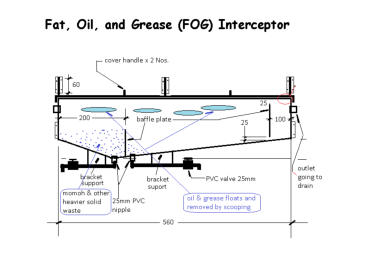
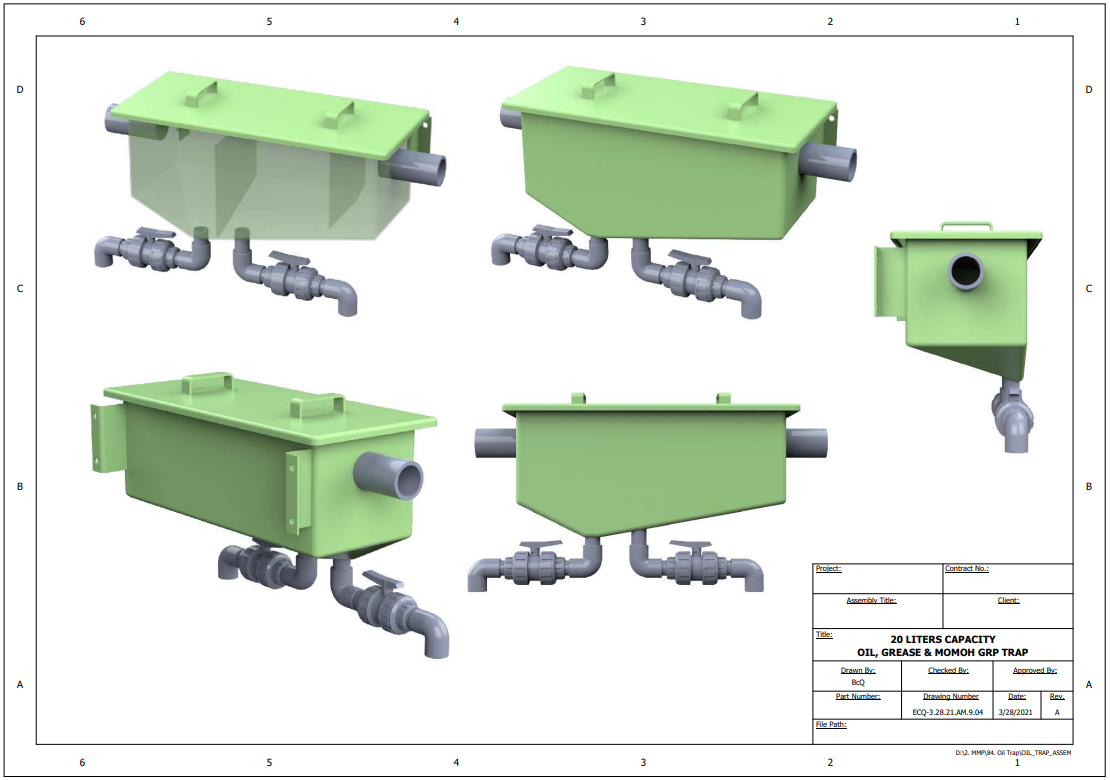
Kitchen wastewater composed of fat, oil and grease (FOG) goes to the inlet of the
interceptor and into the first compartment. Solid particles sink at the bottom, while
the liquid wastewater overflows to the next compartment, over a baffle wall. FOG
starts to float in the second compartment. As the wastewater moves to the last
compartment, through an opening at the last baffle wall, underneath, clear water are
collected and exits at the outlet fitting. This cycle is repeated everytime, new
wastewater enters the interceptor inlet fitting, until such time, the collected FOG
accumulates the whole top surface of the 2 compartments. At this point, it is time to
clean the interceptor.
For a family of 4, this FOG interceptor size, 560mm long by 220mm wide, and depth
of 200mm, would require cleaning weekly. Cleaning is easy because you can
completely lift and remove the top cover, and skim the FOG from the top. Then, flush
out the full content of the interceptor thru the 2 drain valves at the bottom.
Let me show you how the weekly cleaning is done.
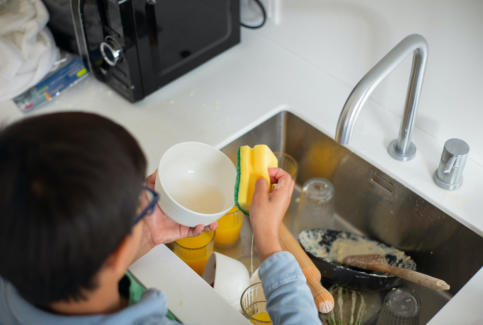
First, remove the top cover, skim the FOG and other waste substances that floats with the
FOG, using an improvised can with handle, into a pail intended for this purpose. Clean all
the top of the 3 compartments until all the FOG and other waste substances are removed.
Open the valve of the primary compartment, flush out the solids clinging to the walls of the
primary compartment. Here, I used a tootbrush. You can use your choice of brush
convenient for you.
Open the other drain valve for the other compartment and repeat the same procedure.
Clean the walls by brushing and flushing with water.
Close the drain valves and close the top cover. That's it.


